麦克风测试
使用此在线麦克风测试工具检查麦克风的工作情况
指示 (用于麦克风测试):
- 点击 '测试' 按钮。
- 如果您在浏览器中看到问题,请单击“允许”。
- 现在,当您通过麦克风讲话时,线路应该会移动!
如果线路对声音有反应,那么这意味着麦克风工作正常!
How our Online Mic Test Tool is Safe to Use?- (Your Privacy Is Very Important To Us)
Our Mic test tool runs on privacy based i.e the “client side” – it means that the mic test team do not and can not record your different voices or any other type of information.
在线麦克风测试有问题?进一步阅读以正确测试您的麦克风。
您无法使用此工具在线进行麦克风测试吗?这是帮助您轻松进行麦克风测试的分步指南。
* 如果您是第一次或在清除历史记录后访问过麦克风测试站点,您的浏览器会要求您允许该站点访问您的麦克风。选择允许进行在线麦克风测试。
* 如果您有个人电脑/笔记本电脑,这个问题应该非常靠近屏幕顶部的地址栏。
* 好吧,如果您有移动设备一直向上滚动。会出现选择 允许.
* 现在,试着用你的麦克风说点什么,让我们的工具进行麦克风测试。然后,当您的麦克风听到任何声音时,您应该能够看到测试盒区域中有一条线上下移动,如下所示 –
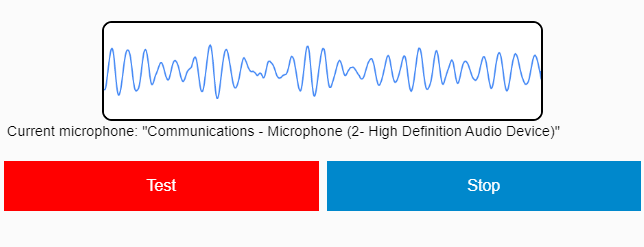
* 如果您在对着麦克风讲话或讲话时看到一条线上下移动,则说明您的在线麦克风测试成功。您的麦克风已正确配置。
Mic Test Trouble-Shooting Guide
如果您在允许访问麦克风后看不到任何线路,请尝试以下步骤:
步骤1。 在某些情况下,您在测试麦克风时不会看到一条线。在这种情况下,请对着麦克风大声说话,看看是否出现了线条。
第2步。 刷新页面并重试。在大多数情况下,它可以解决问题。
第 3 步。 如果您在执行上述两个步骤后无法知道您的麦克风是否工作,请检查您的麦克风是否正确连接到您的设备。
如果您能看到一条线但这条线没有移动,那么您的麦克风要么坏了,要么没有正确设置(更多机会)。
尝试以下步骤来解决问题:
步骤1。 如果您使用 Safari 作为网络浏览器,则应在不同的浏览器(如 Google Chrome、Microsoft Edge)中打开此麦克风测试网站。
第2步。 接下来,确保您的麦克风已连接到笔记本电脑/计算机中正确的(通常为粉红色)插座。如果是带有USB接口的麦克风,请检查它是否正确连接了USB的插座(在这种情况下请不要使用粉红色的麦克风)。
第 3 步。 接下来,确保您的麦克风没有静音。
第四步。 最后但并非最不重要的一点是,确保麦克风上的音量已调高。
尝试在线进行麦克风测试,但您的麦克风仍然无法正常工作?以下为您提供一些解决方案:
您的 Windows 7 或 Windows 10 麦克风无法正常工作吗?好吧,您可以轻松地对操作系统中的麦克风设置进行故障排除,并使麦克风正常工作。
如何在 Windows 10 中更改麦克风设置
如何在 macOS 中更改麦克风设置
如何在 Windows 8 中更改麦克风设置
如何在 Windows 7 中更改麦克风设置
如何在 Ubuntu (Linux) 中更改麦克风设置
了解有关在线麦克风测试的更多信息
使用本网站进行在线麦克风测试有什么好处?
如果您使用 Skype 或 Discord 等应用程序,它们的麦克风测试功能可能没有帮助,您可能不知道您的麦克风是否工作。这些应用程序是为不同的目的而设计的,因此它们不能很好地进行麦克风测试。
但是,使用我们的在线麦克风测试工具,您可以在几秒钟内轻松测试您的麦克风,以立即排除麦克风连接问题。
用软件做麦克风测试有什么问题?
在软件上测试您的麦克风时出现的问题似乎没有听到您的麦克风,因为您无法确定问题出在软件还是您的麦克风中。
如果我的麦克风在某些软件中不起作用,我该怎么办?
如果您能够在本网站上进行在线麦克风测试并发现您的麦克风可以正常工作,但仍然会导致第三方软件出现问题,我们建议您联系该软件的支持团队。
确保您在 themictest.com 上告诉他们您的麦克风工作正常,以便快速解决您的问题。
你也可以 测试您的网络摄像头 如果您使用任何基于视频录制的应用程序,例如 Skype。
FAQs
What are some common microphone issues that a test can identify?
- Distortion: This occurs when the microphone is overloaded and the audio signal becomes distorted. A test can identify whether the audio output is clean or if there is any distortion.
- Background noise: This issue occurs when there is unwanted sound picked up by the microphone. A test can identify the level of background noise and whether it is acceptable or too high.
- Popping or clicking sounds: This can occur when a speaker pronounces certain syllables or letters too forcefully, causing a popping or clicking sound. A test can identify whether the microphone is susceptible to this issue.
- Feedback: This occurs when the audio output is fed back into the microphone, resulting in a high-pitched squeal. A test can identify whether the microphone is susceptible to feedback and how to prevent it.
- Volume issues: This occurs when the microphone volume is too low or too high, making it difficult to hear the audio output. A test can identify whether the volume level is appropriate for the intended use.
- There may be other issues that can be identified through testing, but these are some of the most common ones.
How often should I perform a microphone test?
The frequency of microphone testing depends on how frequently the microphone is used and the criticality of the application it is being used for. In general, it is a good practice to perform microphone tests regularly to ensure that they are functioning properly and to identify any issues before they become major problems.
For example, if the microphone is used in a professional setting such as a recording studio or for live performances, it is recommended to perform tests before every recording or performance session. This can help identify any issues that may impact the quality of the recording or performance.
If the microphone is used in a less critical setting such as for personal use, then testing it once every few months may be sufficient.
It is also important to perform tests after any changes have been made to the microphone or its setup, such as changing the location of the microphone or adjusting the volume. This can help ensure that the microphone is still functioning properly after any modifications.
Overall, it is a good practice to perform microphone tests regularly to ensure that they are functioning properly and to identify any issues before they become major problems.
Can I perform a microphone test on my smartphone or computer's built-in microphone?
Yes, you can perform a microphone test on your smartphone or computer’s built-in microphone. In fact, it is a good practice to test the built-in microphone periodically to ensure that it is functioning properly.
On a smartphone, you can use a voice recorder app or a video recording app to record your voice or other sounds. Then, you can play back the recording and listen for any issues such as background noise, distortion, or volume issues. Some smartphones also have a built-in microphone testing feature that allows you to test the microphone directly.
On a computer, you can use the built-in recording app or a third-party recording app to record your voice or other sounds. Then, you can play back the recording and listen for any issues such as background noise, distortion, or volume issues. Some computers also have a built-in microphone testing feature that allows you to test the microphone directly.
It is important to note that the quality of the built-in microphone can vary greatly depending on the device and its settings. If you require high-quality audio, you may need to invest in an external microphone.
What steps can I take to improve my microphone's performance based on the test results?
- Improve positioning: If the test shows that your microphone is not picking up sound evenly across different frequencies, try adjusting its position. Move it closer or farther away from the sound source, or try pointing it at a different angle. This can help improve the microphone’s frequency response.
- Adjust sensitivity: If the test shows that your microphone is picking up too much background noise, try adjusting its sensitivity. Lowering the gain or volume can help reduce background noise while still capturing the desired sound.
- Improve noise reduction: If the test shows that your microphone has a low signal-to-noise ratio, try using noise reduction techniques such as gating, filtering, or using a noise reduction plug-in. This can help reduce background noise and improve the clarity of the desired sound.
- Reduce distortion: If the test shows that your microphone is producing unwanted distortion, try lowering the gain or volume, or using a pop filter or windscreen to reduce plosives or wind noise.
- Choose the right directional pattern: If the test shows that your microphone is not picking up sound from the desired direction, consider choosing a different directional pattern. For example, if you need to capture sound from multiple directions, an omnidirectional microphone may be more suitable than a cardioid microphone.
It is important to note that some microphone problems may require more advanced solutions or even replacement of the microphone. If you are unsure how to address issues identified in the test, consider consulting with a professional audio engineer or contacting the microphone manufacturer for support.
Can a microphone test help with issues like echo or background noise?
Yes, a microphone test can help identify issues like echo or background noise that are affecting the microphone’s performance. In fact, many microphone tests include measurements of the microphone’s signal-to-noise ratio and its ability to reject background noise.
Echo is typically caused by reflections of sound waves bouncing off surfaces in a room and returning to the microphone. A microphone test can help identify the presence of echo by analyzing the decay time of the sound signal after it is captured by the microphone. If echo is detected, the solution may involve adjusting the microphone’s position or using acoustic treatments like sound-absorbing panels or curtains to reduce the amount of reflection.
Background noise can be caused by a variety of sources, including other people talking, air conditioning, traffic, or electronic interference. A microphone test can help identify the presence and characteristics of background noise, such as its frequency spectrum and its level relative to the desired sound. Solutions to reduce background noise may involve using noise reduction techniques like gating, filtering, or using a noise reduction plug-in, or using a different microphone that is better at rejecting noise.
In general, a microphone test is a useful tool for identifying issues that are affecting the quality of the captured sound. By understanding the causes of these issues, it is possible to take appropriate steps to improve the microphone’s performance and ensure that the desired sound is captured with the best possible quality.
Are there any common mistakes to avoid when performing a microphone test?
Yes, there are several common mistakes to avoid when performing a microphone test to ensure that the results are accurate and reliable. Here are some of the most important mistakes to avoid:
- Using improper equipment: Using equipment that is not suitable for microphone testing, such as low-quality cables, amplifiers, or preamps, can introduce noise or other artifacts that can affect the test results.
- Not following standardized procedures: Microphone testing often involves following specific procedures or guidelines to ensure consistency and accuracy. Not following these procedures can lead to inconsistent or inaccurate results.
- Testing in a poor acoustic environment: Testing a microphone in a poor acoustic environment, such as a room with high reverberation or ambient noise, can affect the test results and make it difficult to accurately measure the microphone’s performance.
- Improper microphone placement: Placing the microphone in an improper position or angle relative to the sound source can affect the test results and lead to inaccurate measurements of the microphone’s frequency response, directional characteristics, and sensitivity.
- Not allowing the microphone to warm up: Some types of microphones require a warm-up period before they can deliver accurate and reliable sound quality. Not allowing the microphone to warm up before testing can affect the test results and make it difficult to accurately measure its performance.
By avoiding these common mistakes and following proper procedures, it is possible to ensure that the microphone test results are accurate and reliable, and that the microphone is delivering the best possible sound quality.