KIỂM TRA MIC

Sử dụng công cụ kiểm tra micrô trực tuyến này để kiểm tra hoạt động của micrô của bạn

Hướng dẫn (Đối với Kiểm tra Mic):

  1. Nhấn vào 'Kiểm tra' Cái nút.
  2. Nhấp vào 'cho phép' nếu bạn thấy câu hỏi trong trình duyệt.
  3. Bây giờ dòng sẽ di chuyển khi bạn nói qua micrô của mình!

Nếu đường dây đang phản hồi âm thanh, điều đó có nghĩa là micrô hoạt động!

How our Online Mic Test Tool is Safe to Use?- (Your Privacy Is Very Important To Us)

Our Mic test tool runs on privacy based i.e the “client side” – it means that the mic test team do not and can not record your different voices or any other type of information.

Bạn gặp sự cố với Kiểm tra micrô trực tuyến? Đọc thêm để kiểm tra đúng cách micrô của bạn.

Bạn không thể thực hiện kiểm tra micrô trực tuyến bằng công cụ này? Dưới đây là hướng dẫn từng bước để giúp bạn kiểm tra micrô một cách dễ dàng.

* Nếu bạn đã truy cập trang web kiểm tra micrô lần đầu tiên hoặc sau khi xóa lịch sử của mình, trình duyệt của bạn sẽ yêu cầu bạn cho phép trang web này truy cập vào micrô của bạn. Chọn Cho phép để thực hiện kiểm tra micrô trực tuyến.

* Nếu bạn có PC / Máy tính xách tay, câu hỏi này phải ở rất gần thanh địa chỉ ở đầu màn hình của bạn.

* Chà, nếu bạn có thiết bị di động, hãy cuộn lên hết cỡ. Nó sẽ xuất hiện để chọn Cho phép.

* Bây giờ, hãy thử nói điều gì đó trong micrô của bạn để công cụ của chúng tôi thực hiện kiểm tra micrô. Sau đó, bạn sẽ có thể thấy một đường di chuyển lên và xuống trong khu vực hộp thử nghiệm bất cứ khi nào micrô của bạn nghe thấy bất kỳ âm thanh nào, như thế này -

 một đường chuyển động để phản hồi âm thanh từ micrô


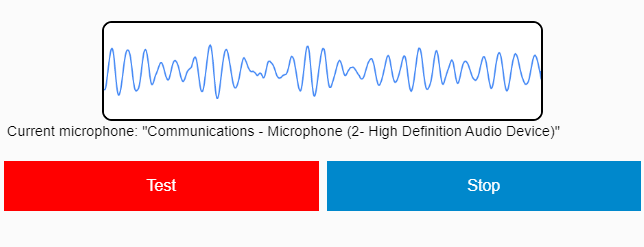
* Nếu bạn có thể thấy một dòng di chuyển lên và xuống khi bạn nói hoặc nói vào micrô của mình, thì quá trình kiểm tra micrô trực tuyến của bạn đã thành công. Micrô của bạn được định cấu hình đúng.

Mic Test Trouble-Shooting Guide

Nếu bạn không thể nhìn thấy bất kỳ dòng nào sau khi cho phép truy cập vào micrô của mình, hãy thử các bước sau:

Bước 1. Trong một số trường hợp, bạn sẽ không thấy đường kẻ khi kiểm tra micrô của mình. Trong trường hợp này, hãy nói tương đối to hơn vào micrô và xem đường này có xuất hiện hay không.

Bước 2. Làm mới trang và thử lại. Trong hầu hết các trường hợp, nó khắc phục sự cố.

Bước 3. Nếu bạn không thể biết micrô của mình có hoạt động hay không sau khi làm theo cả hai bước được hiển thị ở trên, hãy kiểm tra xem micrô của bạn có được kết nối chính xác với thiết bị của bạn hay không.


Nếu bạn có thể nhìn thấy một đường thẳng nhưng đường thẳng không di chuyển, thì micrô của bạn đã bị hỏng hoặc được thiết lập không đúng cách (nhiều cơ hội hơn).

Hãy thử các bước sau để giải quyết vấn đề:

Bước 1. Nếu đang sử dụng Safari làm trình duyệt web, bạn nên mở trang web kiểm tra micrô này trên một trình duyệt khác như Google Chrome, Microsoft Edge.

Bước 2. Tiếp theo, Đảm bảo rằng micrô của bạn được kết nối với đúng ổ cắm (thường là màu hồng) trong máy tính xách tay / máy tính của bạn. Nếu đó là micrô được sử dụng với đầu nối USB, hãy kiểm tra xem đó có phải là ổ cắm được kết nối đúng cách của USB hay không (Vui lòng không sử dụng micrô màu hồng trong trường hợp này).

Bước 3. Tiếp theo, hãy đảm bảo rằng micrô của bạn không bị tắt tiếng.

Bước 4. Cuối cùng nhưng không kém phần quan trọng, hãy đảm bảo rằng mức âm lượng trên micrô được tăng lên.

Đã thử kiểm tra micrô trực tuyến nhưng micrô của bạn vẫn không hoạt động? Dưới đây là một số giải pháp cho bạn:

Micrô windows 7 hoặc windows 10 của bạn không hoạt động? Chà, bạn có thể dễ dàng khắc phục sự cố cài đặt micrô trong hệ điều hành của mình và micrô của bạn hoạt động tốt.

Cách thay đổi cài đặt micrô trong Windows 10
Cách thay đổi cài đặt micrô trong macOS
Cách thay đổi cài đặt micrô trong Windows 8
Cách thay đổi cài đặt micrô trong Windows 7
Cách thay đổi cài đặt micrô trong Ubuntu (Linux)

Tìm hiểu thêm về Kiểm tra Micrô Trực tuyến

Lợi ích của việc tiến hành kiểm tra micrô trực tuyến bằng Trang web này là gì?

Nếu bạn đang sử dụng các ứng dụng như Skype hoặc Discord, tính năng kiểm tra micrô của chúng có thể không hữu ích và bạn có thể không biết micrô của mình có hoạt động hay không. Những ứng dụng đó được thiết kế cho các mục đích khác nhau và do đó chúng không thể thực hiện tốt việc kiểm tra micrô.

Tuy nhiên, bằng cách sử dụng công cụ kiểm tra micrô trực tuyến của chúng tôi, bạn có thể dễ dàng kiểm tra micrô của mình trong vài giây để loại trừ các sự cố kết nối micrô ngay lập tức.

Vấn đề với kiểm tra micrô được thực hiện bằng phần mềm là gì?

Vấn đề khi kiểm tra micrô của bạn trên một phần mềm, phần mềm này dường như không nghe thấy micrô của bạn, là bạn không thể chắc chắn vấn đề nằm ở phần mềm hay micrô của bạn.

Tôi nên làm gì nếu micrô của tôi không hoạt động trong một số phần mềm?

Nếu bạn có thể thực hiện kiểm tra micrô trực tuyến trên trang web này và nhận thấy micrô của mình hoạt động nhưng vẫn gây ra sự cố trong phần mềm của bên thứ ba, chúng tôi khuyên bạn nên liên hệ với nhóm hỗ trợ của phần mềm đó.

Đảm bảo rằng bạn nói với họ rằng micrô của bạn đang hoạt động tốt trên themictest.com để sự cố của bạn được khắc phục nhanh chóng.

Bạn cũng có thể kiểm tra webcam của bạn nếu bạn đang sử dụng bất kỳ ứng dụng dựa trên quay video nào như skype.

Đối mặt với sự cố với webcam không hoạt động trên windows 10 - Bấm vào đây để có giải pháp.

Tìm kiếm mic tốt nhất cho sự bất hòa - Bấm vào đây.

Micrô đắt tiền nhất trong các thiết bị của bạn hay không? Kiểm tra tại đây 7 micrô đắt nhất thế giới

FAQs

What are some common microphone issues that a test can identify?

  • Distortion: This occurs when the microphone is overloaded and the audio signal becomes distorted. A test can identify whether the audio output is clean or if there is any distortion.
  • Background noise: This issue occurs when there is unwanted sound picked up by the microphone. A test can identify the level of background noise and whether it is acceptable or too high.
  • Popping or clicking sounds: This can occur when a speaker pronounces certain syllables or letters too forcefully, causing a popping or clicking sound. A test can identify whether the microphone is susceptible to this issue.
  • Feedback: This occurs when the audio output is fed back into the microphone, resulting in a high-pitched squeal. A test can identify whether the microphone is susceptible to feedback and how to prevent it.
  • Volume issues: This occurs when the microphone volume is too low or too high, making it difficult to hear the audio output. A test can identify whether the volume level is appropriate for the intended use.
  • There may be other issues that can be identified through testing, but these are some of the most common ones.

How often should I perform a microphone test?

The frequency of microphone testing depends on how frequently the microphone is used and the criticality of the application it is being used for. In general, it is a good practice to perform microphone tests regularly to ensure that they are functioning properly and to identify any issues before they become major problems.

For example, if the microphone is used in a professional setting such as a recording studio or for live performances, it is recommended to perform tests before every recording or performance session. This can help identify any issues that may impact the quality of the recording or performance.

If the microphone is used in a less critical setting such as for personal use, then testing it once every few months may be sufficient.

It is also important to perform tests after any changes have been made to the microphone or its setup, such as changing the location of the microphone or adjusting the volume. This can help ensure that the microphone is still functioning properly after any modifications.

Overall, it is a good practice to perform microphone tests regularly to ensure that they are functioning properly and to identify any issues before they become major problems.

Can I perform a microphone test on my smartphone or computer's built-in microphone?

Yes, you can perform a microphone test on your smartphone or computer’s built-in microphone. In fact, it is a good practice to test the built-in microphone periodically to ensure that it is functioning properly.

On a smartphone, you can use a voice recorder app or a video recording app to record your voice or other sounds. Then, you can play back the recording and listen for any issues such as background noise, distortion, or volume issues. Some smartphones also have a built-in microphone testing feature that allows you to test the microphone directly.

On a computer, you can use the built-in recording app or a third-party recording app to record your voice or other sounds. Then, you can play back the recording and listen for any issues such as background noise, distortion, or volume issues. Some computers also have a built-in microphone testing feature that allows you to test the microphone directly.

It is important to note that the quality of the built-in microphone can vary greatly depending on the device and its settings. If you require high-quality audio, you may need to invest in an external microphone.

What steps can I take to improve my microphone's performance based on the test results?

  • Improve positioning: If the test shows that your microphone is not picking up sound evenly across different frequencies, try adjusting its position. Move it closer or farther away from the sound source, or try pointing it at a different angle. This can help improve the microphone’s frequency response.
  • Adjust sensitivity: If the test shows that your microphone is picking up too much background noise, try adjusting its sensitivity. Lowering the gain or volume can help reduce background noise while still capturing the desired sound.
  • Improve noise reduction: If the test shows that your microphone has a low signal-to-noise ratio, try using noise reduction techniques such as gating, filtering, or using a noise reduction plug-in. This can help reduce background noise and improve the clarity of the desired sound.
  • Reduce distortion: If the test shows that your microphone is producing unwanted distortion, try lowering the gain or volume, or using a pop filter or windscreen to reduce plosives or wind noise.
  • Choose the right directional pattern: If the test shows that your microphone is not picking up sound from the desired direction, consider choosing a different directional pattern. For example, if you need to capture sound from multiple directions, an omnidirectional microphone may be more suitable than a cardioid microphone.

It is important to note that some microphone problems may require more advanced solutions or even replacement of the microphone. If you are unsure how to address issues identified in the test, consider consulting with a professional audio engineer or contacting the microphone manufacturer for support.

Can a microphone test help with issues like echo or background noise?

Yes, a microphone test can help identify issues like echo or background noise that are affecting the microphone’s performance. In fact, many microphone tests include measurements of the microphone’s signal-to-noise ratio and its ability to reject background noise.

Echo is typically caused by reflections of sound waves bouncing off surfaces in a room and returning to the microphone. A microphone test can help identify the presence of echo by analyzing the decay time of the sound signal after it is captured by the microphone. If echo is detected, the solution may involve adjusting the microphone’s position or using acoustic treatments like sound-absorbing panels or curtains to reduce the amount of reflection.

Background noise can be caused by a variety of sources, including other people talking, air conditioning, traffic, or electronic interference. A microphone test can help identify the presence and characteristics of background noise, such as its frequency spectrum and its level relative to the desired sound. Solutions to reduce background noise may involve using noise reduction techniques like gating, filtering, or using a noise reduction plug-in, or using a different microphone that is better at rejecting noise.

In general, a microphone test is a useful tool for identifying issues that are affecting the quality of the captured sound. By understanding the causes of these issues, it is possible to take appropriate steps to improve the microphone’s performance and ensure that the desired sound is captured with the best possible quality.

Are there any common mistakes to avoid when performing a microphone test?

Yes, there are several common mistakes to avoid when performing a microphone test to ensure that the results are accurate and reliable. Here are some of the most important mistakes to avoid:

  • Using improper equipment: Using equipment that is not suitable for microphone testing, such as low-quality cables, amplifiers, or preamps, can introduce noise or other artifacts that can affect the test results.
  • Not following standardized procedures: Microphone testing often involves following specific procedures or guidelines to ensure consistency and accuracy. Not following these procedures can lead to inconsistent or inaccurate results.
  • Testing in a poor acoustic environment: Testing a microphone in a poor acoustic environment, such as a room with high reverberation or ambient noise, can affect the test results and make it difficult to accurately measure the microphone’s performance.
  • Improper microphone placement: Placing the microphone in an improper position or angle relative to the sound source can affect the test results and lead to inaccurate measurements of the microphone’s frequency response, directional characteristics, and sensitivity.
  • Not allowing the microphone to warm up: Some types of microphones require a warm-up period before they can deliver accurate and reliable sound quality. Not allowing the microphone to warm up before testing can affect the test results and make it difficult to accurately measure its performance.

By avoiding these common mistakes and following proper procedures, it is possible to ensure that the microphone test results are accurate and reliable, and that the microphone is delivering the best possible sound quality.

viVI