
WINDOWS 10 MIC NOT WORKING?
Windows 10 is very well-known for having mic or microphone multiple issues. If you come across into any one of these issues, no worries: The Mic Test team created this guide to get you out of the problem.
You’ll be presented with several different & multiple easy solutions.
The Mic Test team recommends following the solutions one by one. Check your microphone after each one. Hopefully the problem is gone at that particular stage. If you can judge what the problem is, you can directly move to the corresponding solution.
Solutions 1 – 3 are general checks and configurations. Everyone should make sure they’ve done.
If you are planning to get a brand new wired headphones/headset or if you have an idea you might be having a hardware related issue, solution 4 would be better for the hardware basics that you need. It will help to avoid common compatibility issues.
If you are using a Bluetooth recording device pay extra attention to solution 5, although all the solutions will be helpful.
Solutions 6 – 9 will help in fixing audio drivers and provide you with some other general tips. It will help to boost the performance of your microphone.
Solution 1: Set correct microphone access permissions
Solution 2: Set default recording device
Solution 3: Disable app-exclusive control
Solution 4: Ensure hardware is compatible with the microphone
Solution 5: Connect Bluetooth headset manually
Solution 6: Install the right audio driver on laptop / computer
Solution 7: Uninstall suspicious VOIP apps
Solution 1 : Set correct microphone access permissions
First Step for Windows 10 user is to check the Microphone Privacy Settings page:
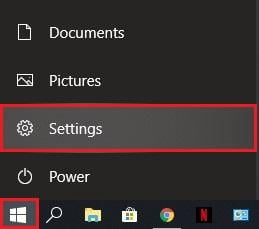
Open Windows Settings from the start menu.
Click the Privacy icon.
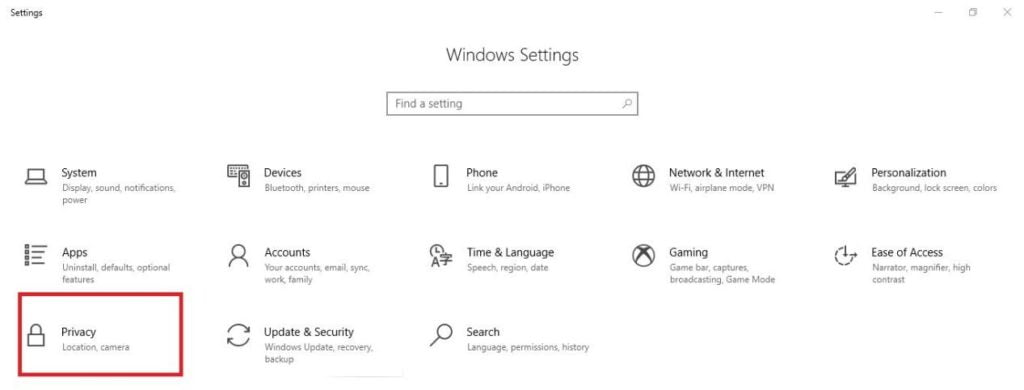
Now from the left pane of it, select Microphone. Check these three settings:
If you are able to see “Microphone access for this device is off”, then click on the Change button. Turn on “Microsoft access for this device”.
If “Allow apps to access your microphone” is currently Off, please toggle position it to On.
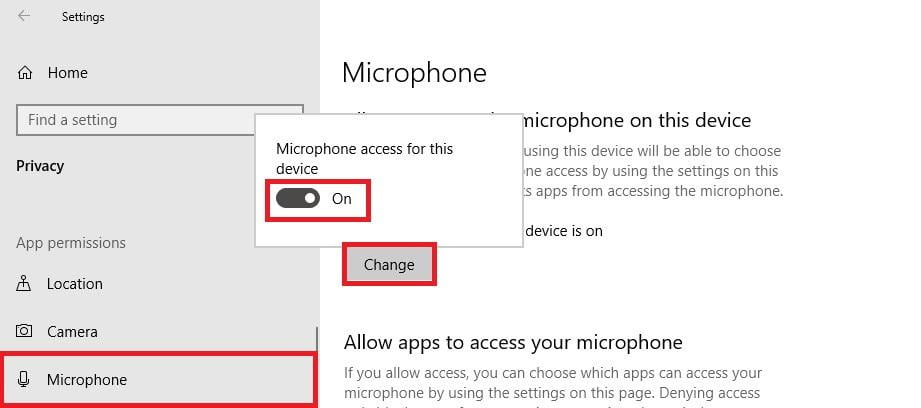
Check the apps list thoroughly and ensure to enable access for the ones that you are trying to use.
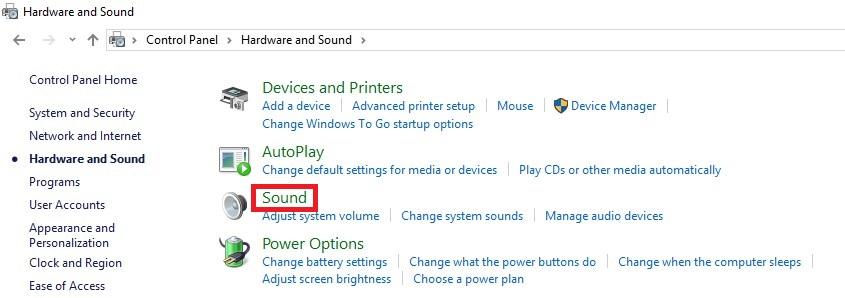
Solution 2 : Set default recording device
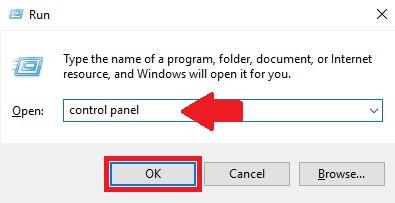
Press on the Windows logo key + R. This will launch Run.
Type Control Panel and then click Ok or press Enter.
Click Hardware and Sound.

Now click on Sound.
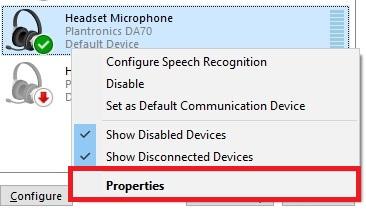
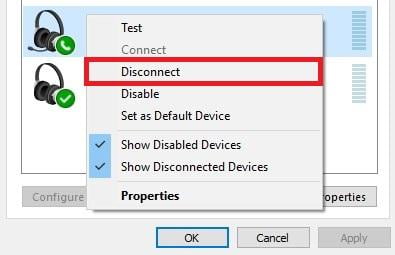
You are now able to see the list of recording devices in the “Recording” tab. Right-click in an empty area in the list. Check – Show Disabled Devices and Check – Show Disconnected Devices.
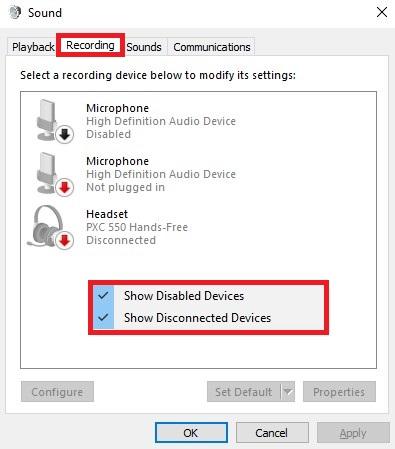
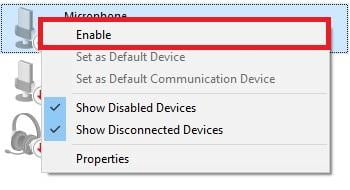
Right-click on each of your recording devices. Ensure they are all Enabled. If a device is already enabled, Disable option in the menu will be shown.
Now speak into your microphone. Ensure that you are away from any other mic or microphones in order to avoid confusions in the next step.
While speaking into the microphone, see if you can visualize or notice any green bars rising on the screen. If the green bars rising next to a particular device then that is the one you are looking for. Select it and click the Set Default button.
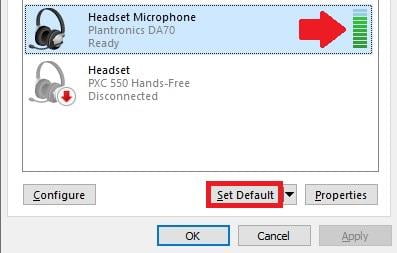
Note that this button will be greyed out in case have only one device in the list, or can also be if the device is already set as the default one.
Solution 3 : Disable app-exclusive control
In the previous step or Solution 2, if by noticing the green bars rising when speaking, you could identify your microphone, apply the following steps to that recording device. If still can not recognize which is the microphone, apply the steps to all the recording devices shown in the list:
From your recording devices list select the microphone and then click Properties.
In the Advanced tab, uncheck the following options:
1. “Allow applications to take exclusive control of this device” and
2. “Give exclusive mode applications priority”.
Solution 4 : Disable app-exclusive control
There are 4 main types of microphones:
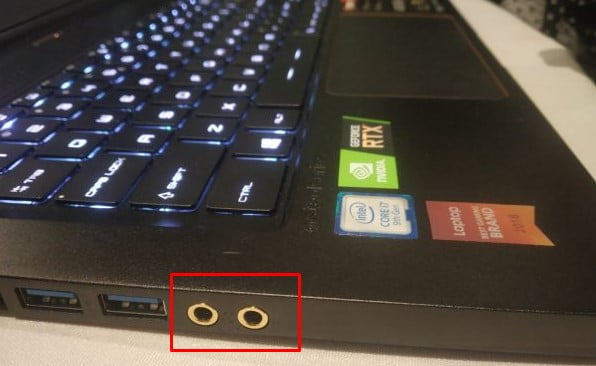
A headset with 2 separate 3.5mm jacks. 1 for the microphone, another 1 for the audio.
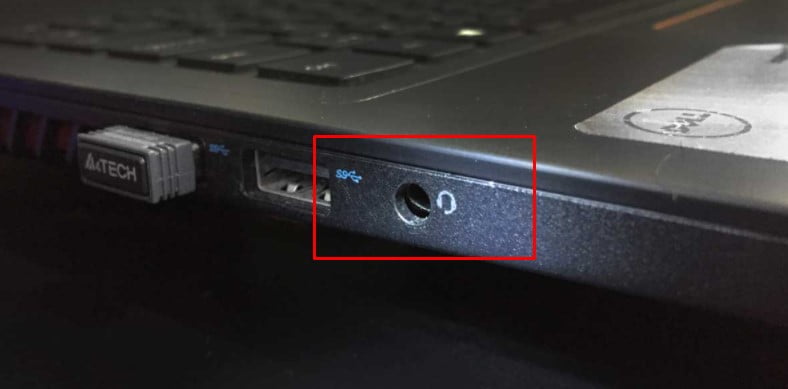
A headset or an earphones with only 1 jack: 2 in 1 (microphone and audio both are in the same 3.5mm jack)
A USB headphones/headset with a microphone.
A Bluetooth headphones/headset with a microphone.
The first two types are a little bit tricky to perform. Read on.
Headphones/headset having two separate 3.5mm jacks then your laptop/computer should also have two separate 3.5mm ports (usually one red and another green): 1 for audio and the other for the microphone. One jack will not suffice.
If only one jack on the computer, either get a one-jack headset or a converter. Converter changes from double 3.5mm jacks to a single 3.5mm jack.
If headphones/headset has only one 3.5mm jack for both of the audio and microphone, the laptop should also have a single 3.5mm headset port in order to capture sound and audio from the microphone. For example the headset that comes with the old iPhones.
Other types of converters include:
A single 3.5mm to a double 3.5mm convertor (this is for single jack headsets. It connects them to a laptop having dual audio ports)
A single 3.5mm to USB convertor
A double 3.5mm to USB convertor
Solution 5 : Connect your Bluetooth headset manually
Normally when both computer’s Bluetooth and Bluetooth headset are on, both get connected to each other automatically. Sometimes they do not connect automatically. Sometimes they are actually connected but still cannot receive and send audio through its microphone.
If your headset is connected still no audio or voice comes out of the headset, you have three options:
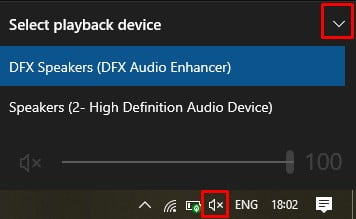
Click on the speaker icon. Click on the little arrow to switch back to the laptop/computer speaker. Again switch back to the Bluetooth headset. Ensure to select the hands-free or headset option and not the Stereo. This is in order to make the microphone work properly.
You can go to the Control Panel > Hardware and Sound > Sound. Here you can find the headset which is listed in the recording devices tab. Right-click on it. Choose to Disconnect. Right-click again and choose Connect. This should reset the connection. It will fix possible mis-connections.
You can always or whenever required disable Bluetooth and then re-enable it. Check if that takes care of the problem.
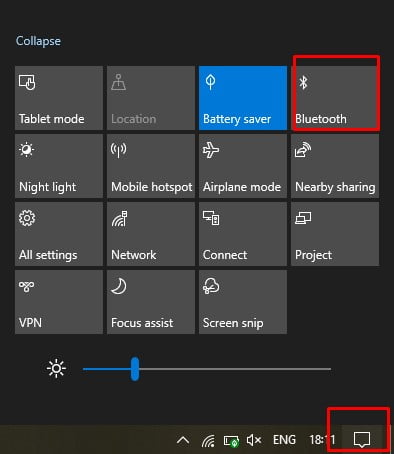
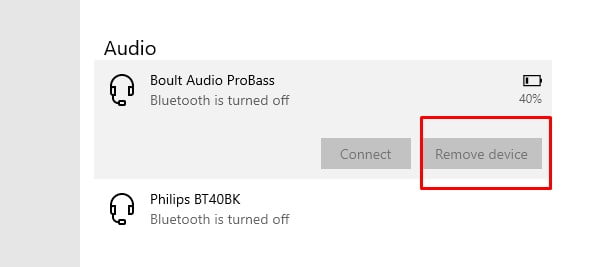
For the case where the Bluetooth headset is not already connected. Uninstall the device. Put the headset into the mode of pairing and re-pair it. To uninstall the device temporarily – go to Settings > Devices > Bluetooth & other devices. Select the headset and choose Remove Device.
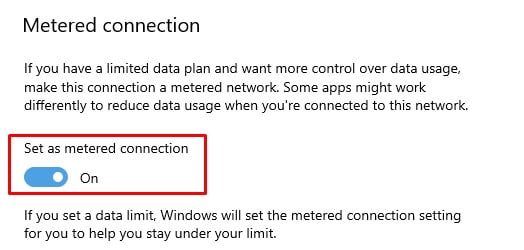
Also, ensure to check the option at the bottom of the same page. Download the necessary Bluetooth drivers even if you have metered connections. Don’t worry , it is usually a small-sized download.
Solution 6 : Install the right audio driver for your Laptop or PC
Mostly, your laptop or motherboard’s manufacturer have the audio driver suitable for your device on its official website. It’s recommended that you should first browse their website download and install the suitable official driver for your device, and then reboot your laptop or PC. That should work for you.
If in case you are not able to find the official driver and the one you have installed isn’t working correctly, please follow these steps below to adjust the default driver:
First, disconnect any other external connected device as much as you can and leave only your mic or headset connected.
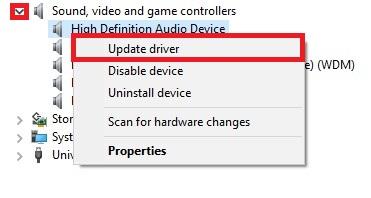
Right-click on your Start menu button or press Windows logo key + X and select Device Manager.

Open Sound, video and game controllers, right-click on High Definition Audio Device and select Update driver.
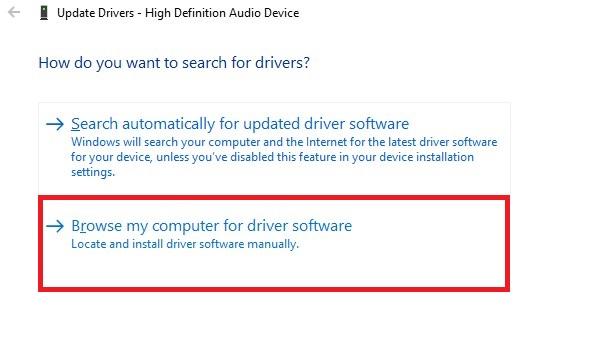
Select the second option: Browse my computer for driver software.
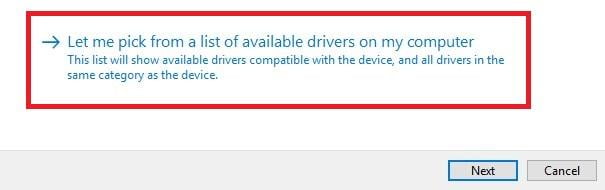
Select : Let me pick from a list of available drivers on my computer and click Next.
Select High definition Audio Device and click Next.
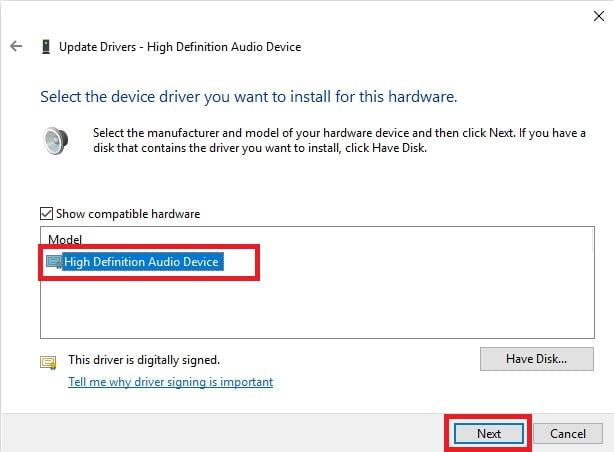
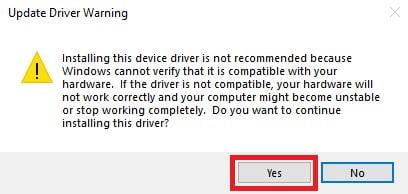
A warning will pop-up will pop out with warning that you are making a change to this driver, please click Yes.
Now reboot your Laptop or PC and check if the mic works.
Solution 7 : Uninstall suspicious or not required VOIP( Voice Over IP) Programs and Applications
VOIP stands for Voice Over IP ( Virtual Phone System ), which basically means audio chat, call or video chat with internet.
Sometimes even if you don’t give access to program to change the settings (check solution 3), some VOIP applications like Skype, Zoom, Viber, Telegram etc. can change your mic settings on their own and stops it from working properly.
That’s why it’s recommended that you should review all your installed VOIP applications on your Laptop and PC and uninstall the ones that may cause such a problem or that are not in use.
Facing issues to record audio on your Mac or Laptop or iPhone or Android. Click here for solution.
Facing issues with Sound – Click Here for the solution.
Facing issues with webcam – Click Here for the solution.