

Introduction
Microphone drivers play a crucial role in ensuring proper functionality of your microphone device on Windows 11. These drivers act as the intermediary software that allows communication between your microphone hardware and the operating system. In this article, we will explore the process of uninstalling and reinstalling microphone drivers on Windows 11, empowering you with the knowledge to troubleshoot and resolve potential issues.
Uninstalling the Microphone Driver in Windows 11
If you encounter issues with your microphone or need to reinstall the driver for any reason, you may first need to uninstall the existing driver. Follow these steps to uninstall the microphone driver in Windows 11:
- Accessing Device Manager
- Press the Windows key + X on your keyboard to open the Quick Access menu.
- Select “Device Manager” from the list of options.

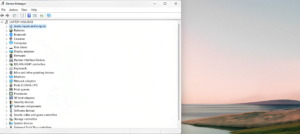
2. Locating the Microphone Driver
- In the Device Manager window, locate and expand the “Audio inputs and outputs” category.
- Right-click on the microphone driver listed under this category.
- Select “Uninstall device” from the context menu.
3. Uninstalling the Microphone Driver
- In the uninstallation confirmation dialog, check the box that says “Delete the driver software for this device.”
- Click on the “Uninstall” button to remove the microphone driver from your system.

Reinstalling the Microphone Driver in Windows 11
After uninstalling the microphone driver, you can proceed with reinstalling it. Windows 11 offers both automatic and manual methods for driver reinstallation.
1. Automatic Driver Reinstallation
Windows 11 has a built-in capability to automatically reinstall certain drivers, including microphone drivers. To utilise this feature:
- Restart your computer. Upon restarting, Windows 11 will detect the missing driver and automatically reinstall it.
- Ensure your computer is connected to the internet to allow Windows to download the necessary driver files.
2. Manually Downloading the Microphone Driver
If the automatic reinstallation doesn’t occur or you prefer a manual approach, you can manually download the microphone driver from the manufacturer’s website. Follow these steps:
- Identify the make and model of your microphone.
- Visit the manufacturer’s website and navigate to the support or downloads section.
- Locate the appropriate driver for your microphone model and download it to your computer.
3. Installing the Microphone Driver
Once you have the driver file, follow these steps to install the microphone driver manually:
- Locate the downloaded driver file on your computer.
- Double-click on the file to launch the installation wizard.
- Follow the on-screen instructions provided by the installation wizard to complete the installation process.
Conclusion
Uninstalling and reinstalling microphone drivers on Windows 11 can be an effective solution to troubleshoot microphone-related issues. By following the outlined steps, you can ensure that your microphone driver is functioning optimally, allowing you to enjoy crystal-clear audio during your activities. Remember the importance of maintaining up-to-date drivers and seeking professional assistance if needed. With the right knowledge and approach, you can overcome any microphone driver challenges that come your way, enhancing your Windows 11 experience.
Do you frequently use voice-based applications/ softwares like Skype? Make sure to test your mic online before joining meetings and calls.
Facing issues with webcam – Click Here for the solution.